I'm watching masterchef. Tonight is the team challenge where the participants take Oz Harvest refigerated vans, drive them around Sydney to various hotels and restaurants, take food that would otherwise be wasted and turn their findings into a meal that they can present to 25 very serious chefs, restaurant critics and food editors.
Oz Harvest is a charity that takes food that's still good from hotels, shops and restaurants that would otherwise be thrown out and turns it into meals for the homeless. What a wonderful charity! So, tonight they're taking premium food off the homeless and serving it to Australia's finest. Ok. Oh! a wild development appears, They are donating to the charity based on what they think of the meals. Good stuff!
Seriously though, food waste is a really major issue. Up to 60% of the food that comes to westernised nations is just wasted. It never makes it to the stomachs of people. In a world where literally billions of people are starving. You know that pizza crust you left behind? There's someone on this world who would be grateful to have that as a meal. Yes, I know you can hear me; I sound just like your mum. I'm telling you "Finish what's on your plate! there's starving kids in Africa!" Your mum is right. There are people, in many countries around the world, literally starving.
I could go on, but to do so would break one of the rules of my blog; I don't discuss the 'why's' of being vegan on here. So, if it's a topic that interests you (the connection between a carnivore diet and world hunger) feel free to email me to discuss, have a chat to your local vegan society or do your own research on the issue.
I decided tonight that in the spirit of the Masterchef challenge, I'd go through my own fridge and cupboard to use up some veggies that have been kicking around there since last weekend's shopping trip. Here's what I found.
-1 punnet of (slightly wrinkly) cherry tomatoes.
-4 mushrooms (looking good vern)
-1/2 a package mixed salad leaves.
-left-over fresh pasta (from my megan makes fresh pasta vegan challenge)
-1/4 jar of discount olives (whole with the pit in)
-2 cloves of garlic
-whole-grain mustard
In my cupboard I keep a few basics. These include:
-olive oil
-balsamic vinegar
-salt
-pepper
By the ingredient list, it all looks a bit italian... So I start by.
Putting on a pot of water to cook that pasta.
I think about a pasta salad, reject the idea because the tomatoes are a bit marginal and really need to be cooked, then realise that there is now law that says I can't do beautiful balsamic roasted tomatoes and put them in my salad. So:
I pre-heat my oven
I get a oven-tray, pour a reasonably generous amount of olive oil into it.
Then, I cut my cherry tomatoes in half, tossing the halves into the oven tray with the oil.
Sprinkle it with a little bit of salt and pepper, adjusting the amount to your personal tastes.
Finally I splash it with a bit of balsamic vinegar. (you don't need much, maybe 6-7 drops or splodges as it comes out of the bottle)
I put that in the oven with the timer set on 20 minutes.
I wash my salad leaves and dice my mushrooms.
By now my water is boiling for the pasta, I decide to turn my left over fresh pasta into "Stracchi" which is Italian for "Scraps" having stracchi pasta is a traditional peasant food, because it involves using your left over pasta to cook the final meal for the week. You can use your broken pasta bits, broken up lasagne sheets or whatever is on hand. Stracchi really captures the spirit of not wasting any food.
I cut my fresh rolled pasta into random sized bits and toss it into the water. Fresh pasta cooks really quickly, so I now have 2 minutes to do a quick salad dressing.
I get a glass jar (an old coffee jar to be exact)
I don't use exact measurements when I make salad dressing, I use ratios, then guestimate the seasonings, taste it and adjust as needed.
-3 parts olive oil
-1 part balsamic vinegar
2 cloves garlic (very very finely diced)
approx 1tsp whole-grain mustard.
Chuck all of these into the jar, put the lid on very tightly and shake the living daylights out of it.
I assemble my salad very quickly by tossing the pasta, tomatoes, mushrooms and olives through the salad leaves. I dress it with the prepared balsamic dressing.
You'll have to trust me it looked good. I took a photo but "ate" all of my internet already so it's uploading slower than a wet week.
As an added bonus, I've got a lovely tangy balsamic vinagrette to store in my fridge for later. It will keep really well for at least a couple of weeks.
Not wasting food just makes perfect sense. You save money, you reduce waste and the impacts that throwing things out to landfill has on the environment and you know that weather near or far, your mum is proud of you for being so thrifty and clever.
Also, if you are reading this blog and are a producer of food, anything from fine-dining to convenience stores and you'd like to
A)help out people who really need it
B)get that feel-good sensation that only comes with doing some good
C)save on your garbage disposal costs
D)possibly get a mad sweet tax deduction (check with your accountant/financial adviser to be totally sure on that)
Then check out Oz Harvest, or even a few other charities who do similar worthwhile work, such as One Umbrella and Food Not Bombs.
Now... getting this world from a place where we feel good by helping the homeless, to where we feel good because we've stamped out all poverty and everyone has a home, a job, and the opportunity to shine is a bit more of a journey. Starting with not wasting things is good though. Do you know someone who'd appreciate a surprise meal they didn't have to cook for themselves? Turn your thrifty-cleverness into a semi-random act of kindness. You'll literally be making this world a better place.

Megan Makes it Vegan
Wednesday, 30 May 2012
Tuesday, 22 May 2012
Megan makes fresh pasta vegan
Masterchef is on TV! I've been so excited by season 4 so far. I'm loving that the show is getting back to basics, it's all about cooking great food. I'm hoping it stays that way and doesn't become all about he-said she-said politics and power plays. I really want the best cook to win. At this stage, my money is on Amina. I think she's a wonderful cook who truly loves food and knows how to present it.
The Masterchef pasta challenge (on TV last week) was actually a really good and fair test of skills a cook needs. The first phase of the test involved identifying different types of pasta by their traditional Italian names. Knowing your ingredients is an important skill for any chef. The next challenge involved making a minimum 250g of fresh pasta, without the benefit of scales to weigh out the flour. Another fair test of a chef. They need to work fast and need to be able to eye-ball measurements. The final challenge involved reproducing a dish without a recipe, just by seeing and tasting the dish. I feel there's a few parallels to my efforts on this blog here. Only I don't taste the meat dish before trying to make it vegan. Occasionally I bombard my work colleagues with questions like "what does salami smell like?' "who in the world actually likes scollops?" I really feel for the Masterchef contestants. They have to live in the Masterchef house, with a bunch of new people, cook on TV and do it all to some pretty serious time pressure. Meanwhile back at home....
My biggest challenge is typing a blog around an inquisitive kitten who likes to alternate between attacking the cursor and the keyboard. Shows like Masterchef make me realise that what I most like about cooking is that it's so relaxing. When I'm at home in my kitchen cooking something new, or whipping up an old favorite I'm having fun and relaxing.
Hey Nigella it's not all about you, in fact this blog entry isn't even about you at all!
Fresh pasta is incredibly simple to make. If making it according to the traditional recipe, you just need flour and eggs. 100grams of flour to one egg to be precise. Mix those two ingredients in these ratios together and you will end up with pasta dough.
You can make a vegan pasta by just using flour and water. However this will really only produce pasta that's at most one step above the dried pasta you get in the supermarket. I want to make pasta that is really special. So I do a little bit of extra work to replicate the chemical composition of an egg in my pasta.
I start by weighing out 200g of plain flour. I then add 50g of chick pea flour. You can also see Chick pea flour labelled as Besan. It's more commonly used in Indian cooking.
The Chick pea flour is high in protein, and will help replicate the protein present in egg white. I then add 2 tablespoons of vegetable oil. Any vegetable oil will do really. I also add a very tiny pinch of tumeric. This spice is also commonly used in Indian cooking, but in the quantity used here won't flavour the pasta at all but will add a little bit of yellow colour that would normally be obtained from the egg yolk.
I also needed 2/3 of a cup of water to get this mixture to become a firm dough. Your pasta may need a little less or a little more depending on a few factors such as how dry your pasta is, how cold the water is or how humid the air in your kitchen is.
Once I mixed my pasta dough together it looked like this.
 I now need to roll this pasta out. I don't have a pasta machine, so just use my rolling pin. I roll it very thin (approx 2mm thick). It looks like this.
 Okay, now I've made a lovely sheet of fresh pasta what do I do with it? I decide that since I've been receiving requests for some time from a friend to make her favorite food vegan, I figured that today was the day to make lasagne vegan.
I want to do this dish carefully, the lady I'm cooking for is a very serious lasagne connoisseur... a lasagnesseur.
I start by preparing a vegan bolognaise style sauce. I use.
2 cloves garlic
1 onion, diced
splash olive oil
1 can diced tomatoes
2tbs tomato paste
2 tsp mixed herbs
3 button mushrooms
1 cup TVP.
WTF is TVP?
You will find this bad-boy in the health food aisle. It's made from 100% soy beans. Prepare it to package directions (which involves soaking it in boiling water)
I start by heating the olive oil in a pot, then once it's fragrant adding the onions. Once the onions brown throw in the can of tomatoes, herbs mushrooms, tomato paste and prepared TVP. Taste the sauce and adjust the herbs to your personal taste. Feel free to add salt and pepper to your own preference. My bolognaise looks like this.
 Turn the heat down low, and let it simmer away until it's nice and thick. To make lasagne you want to have it a bit thicker than a regular bolognaise sauce that you'd use for spaghetti.
The next component in a lasagne is a really good bechemel sauce. I decide to make a vegan bechemel sauce with a hint of garlic. Here's what I used in my vegan garlic bechemel sauce.
3tbs nuttelex,
2tbs flour
2 cups soy milk
2 cloves garlic.
Melt the nuttelex on the stove, while finely chopping 2 cloves of garlic. Once the nuttelex is melted add the garlic. Add the 2 tablespoons of flour while rapidly stirring over a medium heat. You are making a roux. The flour and butter will thicken, if it gets lumpy don't panic. You can do what the real chefs do and just pass it through a sieve at the end. :-D
Here's my Roux.
 Then you need to add your 2 cups of soy milk in a slow and steady stream while stirring. Once the sauce is heated through it will be cooked. Taste it, adjust if you need to. I found mine was absolutely perfect!
Now it's time to assemble your lasagne. Start off with one ladle of the bolognaise sauce on the base of your lasagne dish. Then a layer of pasta, then a layer of bechemel, then bolognaise, then pasta.
 I only have small baking dishes, so I actually made 2 lasagnes, one square, and one oval. The oval lasagne is shown above.
Traditional lasagne is finished with a layer of bechemel sauce then cheese on top. Vegans don't eat cheese so I need to improvise.
I take a tub of tofutti, some garlic dried parsley, oregano, salt and a pinch of tumeric (for colour) and beat it to a smooth paste with approximately 3tbs of vegetable oil. I topped my lasagne with this mix and baked it at 190 degrees C for half an hour.
Here's what the finished product looked like.
Here's my review: "OMG! That vegan lasagne was great."
Thanks for trying out my vegan lasagne Stacey. It was a pleasure to cook for you.
The Masterchef pasta challenge (on TV last week) was actually a really good and fair test of skills a cook needs. The first phase of the test involved identifying different types of pasta by their traditional Italian names. Knowing your ingredients is an important skill for any chef. The next challenge involved making a minimum 250g of fresh pasta, without the benefit of scales to weigh out the flour. Another fair test of a chef. They need to work fast and need to be able to eye-ball measurements. The final challenge involved reproducing a dish without a recipe, just by seeing and tasting the dish. I feel there's a few parallels to my efforts on this blog here. Only I don't taste the meat dish before trying to make it vegan. Occasionally I bombard my work colleagues with questions like "what does salami smell like?' "who in the world actually likes scollops?" I really feel for the Masterchef contestants. They have to live in the Masterchef house, with a bunch of new people, cook on TV and do it all to some pretty serious time pressure. Meanwhile back at home....
 | ||
| Meet Kavesh. An almost unlimited source of cuteness |
 |
| Nigella says "Would you cut the crap and blog about food?" |
Hey Nigella it's not all about you, in fact this blog entry isn't even about you at all!
Fresh pasta is incredibly simple to make. If making it according to the traditional recipe, you just need flour and eggs. 100grams of flour to one egg to be precise. Mix those two ingredients in these ratios together and you will end up with pasta dough.
You can make a vegan pasta by just using flour and water. However this will really only produce pasta that's at most one step above the dried pasta you get in the supermarket. I want to make pasta that is really special. So I do a little bit of extra work to replicate the chemical composition of an egg in my pasta.
I start by weighing out 200g of plain flour. I then add 50g of chick pea flour. You can also see Chick pea flour labelled as Besan. It's more commonly used in Indian cooking.
 | |||
| Chick pea flour |
I also needed 2/3 of a cup of water to get this mixture to become a firm dough. Your pasta may need a little less or a little more depending on a few factors such as how dry your pasta is, how cold the water is or how humid the air in your kitchen is.
Once I mixed my pasta dough together it looked like this.


I want to do this dish carefully, the lady I'm cooking for is a very serious lasagne connoisseur... a lasagnesseur.
I start by preparing a vegan bolognaise style sauce. I use.
2 cloves garlic
1 onion, diced
splash olive oil
1 can diced tomatoes
2tbs tomato paste
2 tsp mixed herbs
3 button mushrooms
1 cup TVP.
WTF is TVP?
 | |
| TVP |
I start by heating the olive oil in a pot, then once it's fragrant adding the onions. Once the onions brown throw in the can of tomatoes, herbs mushrooms, tomato paste and prepared TVP. Taste the sauce and adjust the herbs to your personal taste. Feel free to add salt and pepper to your own preference. My bolognaise looks like this.

The next component in a lasagne is a really good bechemel sauce. I decide to make a vegan bechemel sauce with a hint of garlic. Here's what I used in my vegan garlic bechemel sauce.
3tbs nuttelex,
2tbs flour
2 cups soy milk
2 cloves garlic.
Melt the nuttelex on the stove, while finely chopping 2 cloves of garlic. Once the nuttelex is melted add the garlic. Add the 2 tablespoons of flour while rapidly stirring over a medium heat. You are making a roux. The flour and butter will thicken, if it gets lumpy don't panic. You can do what the real chefs do and just pass it through a sieve at the end. :-D
Here's my Roux.

 | ||
| Show off. |

Traditional lasagne is finished with a layer of bechemel sauce then cheese on top. Vegans don't eat cheese so I need to improvise.
I take a tub of tofutti, some garlic dried parsley, oregano, salt and a pinch of tumeric (for colour) and beat it to a smooth paste with approximately 3tbs of vegetable oil. I topped my lasagne with this mix and baked it at 190 degrees C for half an hour.
Here's what the finished product looked like.
 |
| holy crap it actually looks like lasagne. |
Thanks for trying out my vegan lasagne Stacey. It was a pleasure to cook for you.
Thursday, 17 May 2012
Megan makes Nigella's "left-over chicken thai soup" vegan.
Howdy,
Well winter seems to be making an early arrival here in Australia's national capital. Minimum temperatures are getting below freezing, mornings have that beautiful winter-wonderland frosty look. It's getting cold. Also I'm back in the office beavering away at my day-job. Saying it's a bit busy would be an understatement! That's how I like to work though, I tend to do better with a bit of deadline-pressure.
I got home from work the other night wanting a dinner that was quick, easy, tasty and warming. I thought it would be time to make Nigella's left-over chicken thai soup vegan.
Thai cooking lends itself really well to vegan and vegetarian cooking. Most Thai restaurants list their curries on their menu with options to have the dish either with tofu, vegetables, meat or fish. I say hi to the feline residents, but they politely decline to join me in the kitchen today. They're camped out on my bed having a snooze and do not wish to be disturbed. So I get out of my suit ASAP, slip into something a little more snuggly and start cooking.
Nigella wants me to start off by heating up one liter of chicken stock in a pot.
I don't quite start off the same way Nigella does. I can't use some of the Asian seasoning Nigella uses such as fish sauce; so I want to give the spices I can use the best chance to make this dish as flavoursome as possible.
I start off by heating 2tsp of crushed chilli, 1tsp crushed ginger, 1tsp of crushed garlic and 2tbs of lime juice in a pot. I'm not adding any oil to this as later on I'll be putting some coconut cream in the soup, which will add plenty of texture, and allow any fat-soluble flavours to be well and truly dissolved into the mix.
While that's heating, I take about half a packet of mung-bean vermicelli noodles and place them in a large bowl. Turn on the kettle to boil some water. These noodles will cook just by soaking in the hot water. They're great to take camping, or for any time you want to have something cooked with minimum time, effort or equipment.
Once the spices smell really good, I add 2 cups (500ml) of vegetable stock and 2tsp of tamarind paste. This is less stock than Nigella used, but I'm cooking a smaller quantity of soup than she did. My plan is to make 2 servings, one for me and one for my freezer. I haven't scaled down the tamarind paste, as I want the dish to taste very tangy which is what the tamarind will do. The tamarind paste you can buy in the jar is easier to use than the hard preserved tamarind you buy in plastic bags at a deli or other food store.
By this time the kettle has boiled, so I pour enough water over the mung bean noodles to cover them and leave them to soak for a few minutes. I then get to work chopping some green vegetables to add to my soup. I use a bunch of spinach (leaves and stalk) and a baby bok-choy. Just about any leafy green will do.
At this point Nigella fetches her left-over roast chicken from the fridge and pops it into the soup. This is all going to cook very quickly, in a matter of minutes. I decide I want this dish to be fairly light, so don't go for any of the commercially available meat substitutes. I'm keeping this one very simple, and substituting some sliced button mushrooms in place of the chicken.
After the mushrooms go in (I used three, but that's mainly because that's how many were in my fridge) I then pop open a can of coconut milk and pour it in. My can was 270g size.
While I'm waiting for the mushrooms to cook a little, I drain the mung-bean noodles and pour them into the soup pot. I place the spinach stalks in first, stirring the soup to get them right through the mix. I float the spinach leaves on top of the soup, to let them steam and wilt a bit before stirring through.
I then chop about 1/3 of a bunch of coriander and 2 red chillies (I love chilli and hot flavors if your palate is more sensitive than mine you can reduce the amount of chilli to suit your personal preference) while waiting for the spinach to wilt a bit. I then turn off the heat, stir the spinach leaves through the soup.I then quickly stir through the coriander and chilli, then ladle out my serving.

Making this soup vegan wasn't a huge challenge at all and I feel I kept with the spirit of the recipe by using 'left over' vegetables in my fridge rather than going to the shop to buy something specially to cook.
The whole dinner from walking into the kitchen to walking out of the kitchen took me a grand total of fifteen minutes, so it's an absolute win for a week-night meal.
I'm happy with how this one turned out, I'd be comfortable to make it for visiting friends. Give it a go and let me know how it worked out for you.
Well winter seems to be making an early arrival here in Australia's national capital. Minimum temperatures are getting below freezing, mornings have that beautiful winter-wonderland frosty look. It's getting cold. Also I'm back in the office beavering away at my day-job. Saying it's a bit busy would be an understatement! That's how I like to work though, I tend to do better with a bit of deadline-pressure.
I got home from work the other night wanting a dinner that was quick, easy, tasty and warming. I thought it would be time to make Nigella's left-over chicken thai soup vegan.
Thai cooking lends itself really well to vegan and vegetarian cooking. Most Thai restaurants list their curries on their menu with options to have the dish either with tofu, vegetables, meat or fish. I say hi to the feline residents, but they politely decline to join me in the kitchen today. They're camped out on my bed having a snooze and do not wish to be disturbed. So I get out of my suit ASAP, slip into something a little more snuggly and start cooking.
 | |
| I am warm and comfortable, your argument is invalid. |
I don't quite start off the same way Nigella does. I can't use some of the Asian seasoning Nigella uses such as fish sauce; so I want to give the spices I can use the best chance to make this dish as flavoursome as possible.
I start off by heating 2tsp of crushed chilli, 1tsp crushed ginger, 1tsp of crushed garlic and 2tbs of lime juice in a pot. I'm not adding any oil to this as later on I'll be putting some coconut cream in the soup, which will add plenty of texture, and allow any fat-soluble flavours to be well and truly dissolved into the mix.
 |
| Yet another occasion I wish you could smell this blog. |
While that's heating, I take about half a packet of mung-bean vermicelli noodles and place them in a large bowl. Turn on the kettle to boil some water. These noodles will cook just by soaking in the hot water. They're great to take camping, or for any time you want to have something cooked with minimum time, effort or equipment.
Once the spices smell really good, I add 2 cups (500ml) of vegetable stock and 2tsp of tamarind paste. This is less stock than Nigella used, but I'm cooking a smaller quantity of soup than she did. My plan is to make 2 servings, one for me and one for my freezer. I haven't scaled down the tamarind paste, as I want the dish to taste very tangy which is what the tamarind will do. The tamarind paste you can buy in the jar is easier to use than the hard preserved tamarind you buy in plastic bags at a deli or other food store.
By this time the kettle has boiled, so I pour enough water over the mung bean noodles to cover them and leave them to soak for a few minutes. I then get to work chopping some green vegetables to add to my soup. I use a bunch of spinach (leaves and stalk) and a baby bok-choy. Just about any leafy green will do.
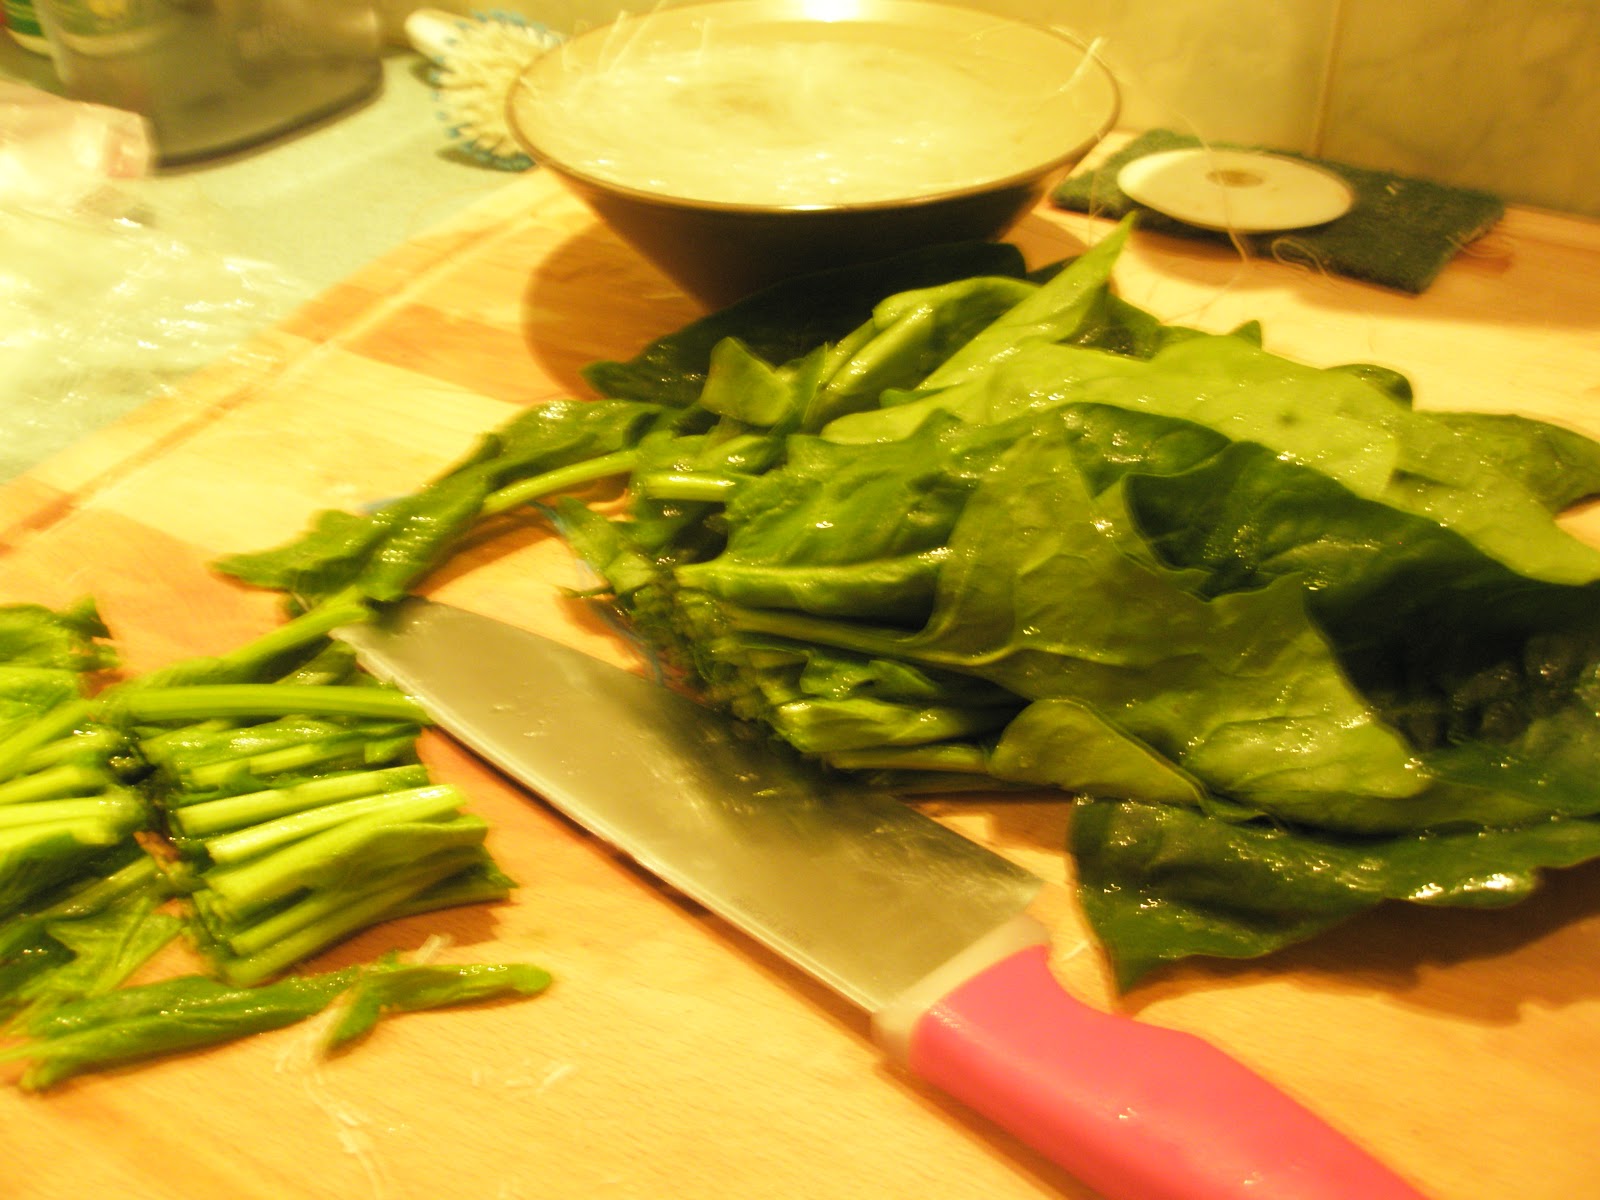 |
| Foreground: Chopped spinach. Background: mung bean vermicelli noodles soaking away |
After the mushrooms go in (I used three, but that's mainly because that's how many were in my fridge) I then pop open a can of coconut milk and pour it in. My can was 270g size.
While I'm waiting for the mushrooms to cook a little, I drain the mung-bean noodles and pour them into the soup pot. I place the spinach stalks in first, stirring the soup to get them right through the mix. I float the spinach leaves on top of the soup, to let them steam and wilt a bit before stirring through.
I then chop about 1/3 of a bunch of coriander and 2 red chillies (I love chilli and hot flavors if your palate is more sensitive than mine you can reduce the amount of chilli to suit your personal preference) while waiting for the spinach to wilt a bit. I then turn off the heat, stir the spinach leaves through the soup.I then quickly stir through the coriander and chilli, then ladle out my serving.

Making this soup vegan wasn't a huge challenge at all and I feel I kept with the spirit of the recipe by using 'left over' vegetables in my fridge rather than going to the shop to buy something specially to cook.
The whole dinner from walking into the kitchen to walking out of the kitchen took me a grand total of fifteen minutes, so it's an absolute win for a week-night meal.
I'm happy with how this one turned out, I'd be comfortable to make it for visiting friends. Give it a go and let me know how it worked out for you.
Wednesday, 9 May 2012
Megan makes Nigella's french toast with stewed fruit vegan
I'm on holidays from work. I'm taking my sabbatical at home to get enough time to build my veggie garden. By gardening I mean....
and...
On the first morning of my holidays I made myself Nigella's french toast vegan. I felt like a truly indulgent breakfast to kick-start my relaxation time, and I'm pleased to say it really hit the spot. I'll apologise in advance for the pictures in the blog, for some reason it looks like a drunken lemur is operating my camera instead of me. I never profess to be a skilled photographer, but these photos are pretty terrible. You'll see in a moment.
Nigella wants you to make a french toast mix using eggs, milk, vanilla essence and a little sugar. I did a little bit of research into getting the optimum vegan french toast recipe. In actual fact, there's a very easy way to replicate the exact taste and texture of a french toast mix, but you need to buy a product from an online store, or a very well stocked health-food shop. However, as the rules of my blog limit me to an average supermarket, I'll be making it from what's available. Here's the recipe for the stuff to dip your bread into.
1 cup soy milk. (full fat, don't use the low-fat one)
100 grams sugar.
1 tsp vanilla essence, or extract.
1 heaped tbsp corn-flour.
Put all of these ingredients into a bowl, and either whisk, or use a stick-blender to make sure they're really well mixed.
I used a hand-cranked beater. I found it at a second hand shop for a dollar in a small country town. I like the hand-operated one it's less noisy which is a bit easier to tolerate first thing in the morning before getting to your first coffee. However, the stick blender would do it quicker. My french-toast mix looked like this.
Put that aside, and get the fruit started. Stewed fruit does not need to take ages, and isn't difficult. Nigella's stewed fruit is actually completely vegan. (thanks Nigella!) I adjusted the recipe slightly, to use up a marginal apple. You can stick to Nigella's recipe or throw in some other fruit if you wish. Here's the stewed fruit recipe.
-1 plum, cut into half and stone removed. (quarters if it's a big plum)
-1 apple cut into chunks and core removed.
-1 cup cranberry juice
-1 cinnamon quill
Nigella added sugar to her stewed fruit recipe, as I'm not a huge sweet tooth, and the french toast is pretty sweet, I left the sugar out and let the natural fruit sugars in the plum and apple do the job for me. Feel free to add sugar if you really like sweet things, it might be a good idea to start with about 1 tbsp, then increase bit by bit until you get it to your personal taste.
Place the Cranberry juice on a high heat on a shallow fry-pan on the stove. Once the juice starts bubbling add the cinnamon quill, the plum (cut side down) and the apples. Let them bubble away while you get started on the french toast.
Then all you need is some bread, preferably slightly stale. I used some fairly crusty italian-type bread that I'd left out the night before specifically. Really any bread would be fine, you could even take the sweetness up a notch and use slightly older raisin bread. The only bread that would be a bit difficult would be a really dark rye bread, as it might be harder to see when it's cooked, or some gluten-free breads may not hold up so well when soaked with the mixture.
Place a slice of bread (or two if you have a big shallow bowl) in the soy-milk mixture. Then, put (another) fry pan on the stove, add a nob (approximately 1dessert spoon) of nuttelex (my preferred butter substitute). Once the nuttelex is melted, and the bread fully soaked with the soy milk mixture gently lift the bread out of the bowl and place it in the pan.
Mine took about 2-3 minutes per side to achieve golden brown perfection. This works out very well, as the soy-milk mixture makes enough for about 4-6 slices of bread, and your stewed fruit will take about 10 minutes to be done.
Keep a bit of an eye on the fruit as you're cooking the french toast, turn the heat down to medium or low if it looks like it's getting too bubbly.
The sugar in the soy-milk mixture helps impart a lovely sweet-vanilla flavour to the french toast, and also helps it caramelise and brown nicely, mine looked like this.
As a final touch of fancy-ness once the french toast was done, I tossed a few pecan nuts in the left over nuttelex, which had soaked up a little bit of the sugar from the french toast. Then I had a go at making my food look pretty. While doing this I turned the fruit down to very low, just so that it was kept nice and warm.
So what you see there, is 2 slices of the french toast, some of the stewed fruit on top, and the toasted pecans beside.
What happened when I ate this was an immediate sensation of pure oral bliss. The sweet vanilla bread, crispy on the outside, soft and warm in the middle. The slightly sharp tang of the cranberry tempered by the sweetness of the plums and apples, along with the pecans made this my favourite cooked breakfast ever. Should I be lucky enough to have a guest for a weekend breakfast whom I really really like very much, I'd love to cook this for them.
I might have the last laugh on this one Nigella. My french toast with stewed fruit and toasted pecans is completely awesome. Also... my veggie garden is going to totally kick arse.
 |
| Yep that's a B-double backing up my driveway with my gardening supplies. |
 |
| No they are not matchsticks, each one of those logs weighs about 70kg. |
On the first morning of my holidays I made myself Nigella's french toast vegan. I felt like a truly indulgent breakfast to kick-start my relaxation time, and I'm pleased to say it really hit the spot. I'll apologise in advance for the pictures in the blog, for some reason it looks like a drunken lemur is operating my camera instead of me. I never profess to be a skilled photographer, but these photos are pretty terrible. You'll see in a moment.
Nigella wants you to make a french toast mix using eggs, milk, vanilla essence and a little sugar. I did a little bit of research into getting the optimum vegan french toast recipe. In actual fact, there's a very easy way to replicate the exact taste and texture of a french toast mix, but you need to buy a product from an online store, or a very well stocked health-food shop. However, as the rules of my blog limit me to an average supermarket, I'll be making it from what's available. Here's the recipe for the stuff to dip your bread into.
1 cup soy milk. (full fat, don't use the low-fat one)
100 grams sugar.
1 tsp vanilla essence, or extract.
1 heaped tbsp corn-flour.
Put all of these ingredients into a bowl, and either whisk, or use a stick-blender to make sure they're really well mixed.
I used a hand-cranked beater. I found it at a second hand shop for a dollar in a small country town. I like the hand-operated one it's less noisy which is a bit easier to tolerate first thing in the morning before getting to your first coffee. However, the stick blender would do it quicker. My french-toast mix looked like this.
 |
| Frothy! |
Put that aside, and get the fruit started. Stewed fruit does not need to take ages, and isn't difficult. Nigella's stewed fruit is actually completely vegan. (thanks Nigella!) I adjusted the recipe slightly, to use up a marginal apple. You can stick to Nigella's recipe or throw in some other fruit if you wish. Here's the stewed fruit recipe.
-1 plum, cut into half and stone removed. (quarters if it's a big plum)
-1 apple cut into chunks and core removed.
-1 cup cranberry juice
-1 cinnamon quill
Nigella added sugar to her stewed fruit recipe, as I'm not a huge sweet tooth, and the french toast is pretty sweet, I left the sugar out and let the natural fruit sugars in the plum and apple do the job for me. Feel free to add sugar if you really like sweet things, it might be a good idea to start with about 1 tbsp, then increase bit by bit until you get it to your personal taste.
Place the Cranberry juice on a high heat on a shallow fry-pan on the stove. Once the juice starts bubbling add the cinnamon quill, the plum (cut side down) and the apples. Let them bubble away while you get started on the french toast.
Then all you need is some bread, preferably slightly stale. I used some fairly crusty italian-type bread that I'd left out the night before specifically. Really any bread would be fine, you could even take the sweetness up a notch and use slightly older raisin bread. The only bread that would be a bit difficult would be a really dark rye bread, as it might be harder to see when it's cooked, or some gluten-free breads may not hold up so well when soaked with the mixture.
Place a slice of bread (or two if you have a big shallow bowl) in the soy-milk mixture. Then, put (another) fry pan on the stove, add a nob (approximately 1dessert spoon) of nuttelex (my preferred butter substitute). Once the nuttelex is melted, and the bread fully soaked with the soy milk mixture gently lift the bread out of the bowl and place it in the pan.
 | |
| Yours may look less blurry than this. |
Keep a bit of an eye on the fruit as you're cooking the french toast, turn the heat down to medium or low if it looks like it's getting too bubbly.
The sugar in the soy-milk mixture helps impart a lovely sweet-vanilla flavour to the french toast, and also helps it caramelise and brown nicely, mine looked like this.
 | ||
| mmmmmm french toast goodness. |
 | |||||
| It looked good trust me. |
What happened when I ate this was an immediate sensation of pure oral bliss. The sweet vanilla bread, crispy on the outside, soft and warm in the middle. The slightly sharp tang of the cranberry tempered by the sweetness of the plums and apples, along with the pecans made this my favourite cooked breakfast ever. Should I be lucky enough to have a guest for a weekend breakfast whom I really really like very much, I'd love to cook this for them.
| |
| Hey Megan, sure there's plenty of fish in the sea... but you're a vegan, in the desert, forever alone. Buhahahahaha! |
Wednesday, 25 April 2012
Megan makes Nigella's Buttermilk Scones Vegan
I don't know about where you are right now, but here in Australia's national capital it's starting to cool down for winter. It's time to do warm and comforting things like have hot soup and slip into something a little more flanelette. (typed like only a lady who lives by herself (with her cats) can).
As luck would have it, pumpkin was also ridiculously cheap at my local fruit and veggie shop. Of course, so far I haven't even mentioned Nigella's buttermilk scones yet, but I'm getting there, I promise.
Nigella tells us that scones are an essential part of an afternoon tea. She also introduces an item called "clotted cream" that you're supposed to have with scones, along with some pictures from a clotted cream factory. As far as I can see from the show, it looks like clotted cream is incubated cream that's of a thick and cottage-cheese like texture. I did some research and here's what wikipeda told me. "Clotted cream has been described as having a "nutty cooked milk flavour" with "oily globules on the crusted surface".. hang on... cooked milk? sorry but I hate that smell. oily globules? hmmm crusted surface? dude I was just waiting for the word "pustule" or "fistula" to come up next. As Nigella didn't make clotted cream on the show, and as it doesn't sound like something I'd like to replicate, I'm not even going to go there.
I watched Nigella's scone episode with baited breath... as usual cross legged on my couch in front of the TV note-book in hand. Nigella is up to her usual tricks. I think she used 2 cups of flour, if the measure she uses to scoop flour is a cup size. She added a container of buttermilk, but didn't show the container to the camera very well and also neglected to tell her audience what size the container was. I realise suddenly that it's going to be a struggle to do scones without an accurate recipe in the first place, let alone try and modify that recipe to make it vegan.
So, I decided to make my own twist on scones and add a bit of Australian and vegan food culture into the mix. Making scones is not difficult, anyone can do it. However you do have to get the ratios of all the different ingredients right. Also, as pumpkin was super cheap and it's soup weather, I decided to multi-task and cook some pumpkin soup at the same time. It's a bit of a step up for the inexperienced cook, but this is a very efficient way of doing things. At the end of this blog, you could have a great batch of scones and containers of soup in your freezer for lunches or for a night when you don't feel like cooking. Saves you time and money how good is that.
I started off with this recipe here: http://www.bestrecipes.com.au/recipe/Pumpkin-Scones-L1549.html
The pumpkin scone recipe was actually invented by an Australian, Lady Florence Bjelke Peterson. She was a Queensland senator from the early 1980's to 1993. She also makes totally kick-arse pumpkin scones.
The recipe is fairly straight forward, and didn't take too much modification to make vegan. I started out by chopping some pumpkin and boiling it in preparation to make mashed pumpkin.
Butternut pumpkin is generally a bit sweeter than the grey pumpkin, it's also a lot easier to chop. If you are unsure of your kitchen knives of know from experience that chopping pumpkin is difficult then go for the butternut. It doesn't matter really how small you chop your pumpkin, however if you're in a hurry to make the scones, then the smaller you dice the pumpkin the quicker it will cook.
About 300 grams of raw chopped pumpkin will make you one cup of mashed pumpkin. Here's what mine looked like.
 Put a pot of water on the stove, and get it boiling. Then add the 300g of pumpkin. You want it fairly soft so you can mash it, mine took about 15 minutes. Yours will vary depending on how small you cut your pumpkin. It's done when you can very easily poke a fork through the pumpkin.
Once the pumpkin is cooked drain the water off (using a colander like you would for pasta will do the job) and mash it. If you don't have a potato masher. (plastic or metal kitchen utensil you can get from a supermarket, second hand shop or speciality kitchen shop) then you can mash the pumpkin with a wooden spoon like I did.
Once the pumpkin is mashed, put it in the fridge to get cold. While the mashed pumpkin is chilling for the scones, I moved onto preparing my pumpkin soup. If you don't feel like making the soup as well, then feel free to go and do something else while you wait for the pumpkin to get cold. Go for a bike-ride or something it will take a while to chill down completely.
To make my pumpkin soup I chopped the rest of my pumpkin and weighed it to see how much I had.
It's hard to tell by that picture, but I have almost exactly 1kg of pumpkin. That's enough to make four huge or six medium size servings of soup. If you have 1.5kg of pumpkin, then just increase the amounts of other ingredients I give you by 50%. I'm sure you get the general idea.
To make my pumpkin soup you'll need the following.
-1kg chopped pumpkin.
-1 brown onion
-1 tsp crushed carlic
-1tsp cumin
-4tsp veggie salt or vegeta, or 2 vegetable stock cubes.
-1 liter water
-1/2-1 cup soy milk.
-1tbs vegetable oil
You need to also chop the onion fairly finely.
Put a big pot on the stove, add the oil to it, heat to a medium heat. Once the oil spreads out, or becomes less viscous it's heated enough.
Add the diced brown onion, the crushed garlic and the cumin to the pot, stir them around to coat the onion with the oil and spices. Let that cook for a few minutes. (3-5 minutes) depending on your personal preference, you can do the next step either once the onion has gone translucent (just cooked) or when it's gone a little bit brown (more well done) don't let the onion burn.
Put one liter of water into your kettle and turn it on. Getting the water boiling in there is more energy efficient and will help you get your soup finished faster.
Once you are happy with the state of your onions add the pumpkin to the soup pot and give it a stir to mix everything around. Here's what mine looked like.

Once the kettle has boiled add approximately 1 liter of boiling water to the pot. Be careful if you are using a plastic measuring cup, as you don't want to splash the boiling water onto your hands. It's okay if this is approximate. If you accidentally add a bit too much water don't fret, just let the soup boil for a bit longer and the excess water will evaporate. At the end of the soup-process if the soup is too thick for your liking, then don't fret, you can always add more liquid later. It's your soup, you can make it just the way you want it.
Now that the water is in, add your choice of veggie salt, veggie stock cubes etc. If you are using stock cubes then crumble them with your fingers into the pot to help them dissolve better. If you have health concerns and need to follow an extremely low-salt diet, then you can omit the stock and just use water. You can taste test the soup towards the end, and adjust it with extra garlic or spices if you want.
Now you want to leave the soup to simmer for a while. Simmering is a slow boil, so you want to see small bubbles on the surface of the soup, but not big fast rolling bubbles. I ended up with my stove on quarter power with the lid off. I like my pumpkin soup very thick, so I'm happy to let some of that water evaporate. If you prefer your soup less thick then cooking on low power with the lid on will keep the moisture in. Your soup will take anywhere from half an hour, to forty five minutes to be cooked. You want the pumpkin really really soft as it's going to be blended up at the end.
Now that the soup is cooking away, check on your mashed pumpkin in the fridge and see how it's going. If its room temperature or colder it's fine to make your scones. The reason you can't use the mashed pumpkin while it's hot is that it will melt the fat in the recipe which will change the texture of the scones.
So scomes... here we go.
Firstly, pre-heat your oven to 200C, and prepare a big flat tray by spraying it with some vegetable oil spray, or covering it with a sheet of baking paper.
Lady Flo wants me to start off with 55g of butter. I start off with 55g of nuttelex. You're all familiar with this stuff now I'm sure! you'll find it at the supermarket in the same area the butter is.
Lady flow wants me to beat the butter until it's soft, then add some sugar. I beat the butter until it's soft but omit the sugar purely because of my personal taste, I don't have a big sweet tooth. The sugar won't impact the texture of your scones.
After this, I look over at the stove and give my soup a big stir to make sure it's doing okay.
Lady flow now wants me to mix the mashed pumpkin in with the butter. easy... done.
She now wants me to mix an egg in there too. Sorry Lady Flo, I'm going to use some stuff called 'no egg'. it's an egg replacer you can find in the health-food aisle at the supermarket. It comes in a box. The box tells me that a tablespoon of no egg plus two tablespoons of water will replicate an egg in a baking recipe. In they go.
Now Lady Flo wants me to add half a cup of milk. I add half a cup of soy milk, and mix it up. This will look pretty "wet" but don't worry, you're going to add the self raising flour soon.
You need to follow the instructions a bit carefully here, and add the flour bit-by-bit. You need 2.5 cups of self raising flour, so if you add it in five increments of half a cup each that will work out fine. Make sure that before you add the next increment the first increment is fully mixed through.
At this stage I checked my soup and gave it another stir. My pumpkin was still fairly hard and needed more cooking. If your pumpkin is very soft and starting to break apart, then you can turn the stove off, put the lid on the pot and keep it there until you're ready to get back to the soup for the next stage.
My resultant dough was fairly 'sticky'. If your dough is too sticky you can add a little extra flour. Add it in small increments, about a dessert spoon at a time. It's likely that your dough will be fairly sticky as well. Don't fret this is common with pumpkin scones.
Once you are happy with your dough, then sprinkle some flour on a work surface. Top tip for those who don't love cleaning up their kitchen, you can restrain yourself to a large chopping board to make the clean-up easier, it can be simpler to wash a chopping board than to wipe down your whole bench. tip your dough our onto the floured work surface.
 This isn't like bread, you don't need to kneed the dough very much at all. To correctly kneed the dough you should do the following.
1)pat the dough down until it's about half the height compared to when just tipped out of the bowl.
2)take the top part of the dough, and fold it in half towards yourself, like a calzone or pastie shape.
3)rotate the dough ninety degrees.
4)repeat steps one and two.
Your scone dough will need to be taken through the above process four times maximum.
Once you've done that you can either pat the dough down until it's about 2cm thick. If you have a rolling pin that will make the job a bit quicker, but your hands will do the job just fine.
You can see in the picture above that I'm using a glass to cut my scones out into nice circles. I'm dipping the edges of the glass into the flour, then starting out at the edges to cut as many scones as I can. Place each scone on your prepared tray as you go.
you will end up with 'scraps', make these into a blob again, roll them out and cut again. you may end up with one slightly funny-shaped scone at the end. Nobody will mind.
Once you've cut out your scones and got them all onto the tray put them in the oven to bake for 15 minutes. You'll be in the kitchen finishing the soup while they are cooking so there's little risk of over-doing them. Once they start to smell wonderful they're done.
I check on my soup now, and discover that happily my pumpkin is really soft and breaking up. It's time to blend my pumpkin soup. If you have a stick blender and can blend the soup while it's still in the pot that's great. If not don't worry, pumpkin soup was invented before the stick blender was, just use your potato masher. It will be quicker than you think as long as your pumpkin is really really soft.
Once your soup is mashed or blended, return it to the stove on a low heat. Start by adding 1/2 cup of soy milk and stir through. Use extra soy milk, water, or a bit more cooking time to adjust the texture of the soup to your personal taste. Once you are happy with the texture, then taste the soup. Is it good? could it do with more bite?-add a little bit of pepper more zing?-add a little more crushed garlic, or even some crushed ginger not salty enough?-add a pinch more salt. Once you are happy, keep the soup on a low heat with stirring until it simmers again, then turn the stove off, it's ready to go.
If things play out just right, the time it takes you to finish the soup will be about the same as the time it takes for the scones to be ready.
Here's what my finished soup looked like;
If you're serving this to guests, you can be a bit fancy and decorate the top with chopped chives or a sprig of parsley or coriander.
Here's how the pumpkin scones came out. If your sense of smell doesn't tell you the scones are done, then once the timer goes off you can try a simple test. Using oven gloves turn one of the scones upside down and give it a tap on the bottom. If it sounds hollow it's done.
The soup and scones were well received. A colleague suggested that I enter them into a country show. That would actually be a very good test of my scones... to see if they can truly go head-to-head with their non-vegan counterparts.
In summary.. My scones are different to Nigella's. I think they achieve the same job though, these scones would be absolutely respectable and lovely to take when visiting grand-ma. The soup..... fantastic. The perfect tummy-warmer on a chilly day.
Have a go at making these and let me know how it works out for you. Happy cooking!
As luck would have it, pumpkin was also ridiculously cheap at my local fruit and veggie shop. Of course, so far I haven't even mentioned Nigella's buttermilk scones yet, but I'm getting there, I promise.
Nigella tells us that scones are an essential part of an afternoon tea. She also introduces an item called "clotted cream" that you're supposed to have with scones, along with some pictures from a clotted cream factory. As far as I can see from the show, it looks like clotted cream is incubated cream that's of a thick and cottage-cheese like texture. I did some research and here's what wikipeda told me. "Clotted cream has been described as having a "nutty cooked milk flavour" with "oily globules on the crusted surface".. hang on... cooked milk? sorry but I hate that smell. oily globules? hmmm crusted surface? dude I was just waiting for the word "pustule" or "fistula" to come up next. As Nigella didn't make clotted cream on the show, and as it doesn't sound like something I'd like to replicate, I'm not even going to go there.
I watched Nigella's scone episode with baited breath... as usual cross legged on my couch in front of the TV note-book in hand. Nigella is up to her usual tricks. I think she used 2 cups of flour, if the measure she uses to scoop flour is a cup size. She added a container of buttermilk, but didn't show the container to the camera very well and also neglected to tell her audience what size the container was. I realise suddenly that it's going to be a struggle to do scones without an accurate recipe in the first place, let alone try and modify that recipe to make it vegan.
|
| Hey Megan, here's a recipe for you. Take a tsp of concrete and harden up! |
So, I decided to make my own twist on scones and add a bit of Australian and vegan food culture into the mix. Making scones is not difficult, anyone can do it. However you do have to get the ratios of all the different ingredients right. Also, as pumpkin was super cheap and it's soup weather, I decided to multi-task and cook some pumpkin soup at the same time. It's a bit of a step up for the inexperienced cook, but this is a very efficient way of doing things. At the end of this blog, you could have a great batch of scones and containers of soup in your freezer for lunches or for a night when you don't feel like cooking. Saves you time and money how good is that.
I started off with this recipe here: http://www.bestrecipes.com.au/recipe/Pumpkin-Scones-L1549.html
The pumpkin scone recipe was actually invented by an Australian, Lady Florence Bjelke Peterson. She was a Queensland senator from the early 1980's to 1993. She also makes totally kick-arse pumpkin scones.
The recipe is fairly straight forward, and didn't take too much modification to make vegan. I started out by chopping some pumpkin and boiling it in preparation to make mashed pumpkin.
 |
| Left: Butternut pumpkin, Right:Grey or Kent pumpkin. |
About 300 grams of raw chopped pumpkin will make you one cup of mashed pumpkin. Here's what mine looked like.

Once the pumpkin is cooked drain the water off (using a colander like you would for pasta will do the job) and mash it. If you don't have a potato masher. (plastic or metal kitchen utensil you can get from a supermarket, second hand shop or speciality kitchen shop) then you can mash the pumpkin with a wooden spoon like I did.
Once the pumpkin is mashed, put it in the fridge to get cold. While the mashed pumpkin is chilling for the scones, I moved onto preparing my pumpkin soup. If you don't feel like making the soup as well, then feel free to go and do something else while you wait for the pumpkin to get cold. Go for a bike-ride or something it will take a while to chill down completely.
To make my pumpkin soup I chopped the rest of my pumpkin and weighed it to see how much I had.
 |
| Yet another picture of diced pumpkin on a kitchen scale |
To make my pumpkin soup you'll need the following.
-1kg chopped pumpkin.
-1 brown onion
-1 tsp crushed carlic
-1tsp cumin
-4tsp veggie salt or vegeta, or 2 vegetable stock cubes.
-1 liter water
-1/2-1 cup soy milk.
-1tbs vegetable oil
You need to also chop the onion fairly finely.
Put a big pot on the stove, add the oil to it, heat to a medium heat. Once the oil spreads out, or becomes less viscous it's heated enough.
Add the diced brown onion, the crushed garlic and the cumin to the pot, stir them around to coat the onion with the oil and spices. Let that cook for a few minutes. (3-5 minutes) depending on your personal preference, you can do the next step either once the onion has gone translucent (just cooked) or when it's gone a little bit brown (more well done) don't let the onion burn.
Put one liter of water into your kettle and turn it on. Getting the water boiling in there is more energy efficient and will help you get your soup finished faster.
Once you are happy with the state of your onions add the pumpkin to the soup pot and give it a stir to mix everything around. Here's what mine looked like.

Once the kettle has boiled add approximately 1 liter of boiling water to the pot. Be careful if you are using a plastic measuring cup, as you don't want to splash the boiling water onto your hands. It's okay if this is approximate. If you accidentally add a bit too much water don't fret, just let the soup boil for a bit longer and the excess water will evaporate. At the end of the soup-process if the soup is too thick for your liking, then don't fret, you can always add more liquid later. It's your soup, you can make it just the way you want it.
Now that the water is in, add your choice of veggie salt, veggie stock cubes etc. If you are using stock cubes then crumble them with your fingers into the pot to help them dissolve better. If you have health concerns and need to follow an extremely low-salt diet, then you can omit the stock and just use water. You can taste test the soup towards the end, and adjust it with extra garlic or spices if you want.
Now you want to leave the soup to simmer for a while. Simmering is a slow boil, so you want to see small bubbles on the surface of the soup, but not big fast rolling bubbles. I ended up with my stove on quarter power with the lid off. I like my pumpkin soup very thick, so I'm happy to let some of that water evaporate. If you prefer your soup less thick then cooking on low power with the lid on will keep the moisture in. Your soup will take anywhere from half an hour, to forty five minutes to be cooked. You want the pumpkin really really soft as it's going to be blended up at the end.
Now that the soup is cooking away, check on your mashed pumpkin in the fridge and see how it's going. If its room temperature or colder it's fine to make your scones. The reason you can't use the mashed pumpkin while it's hot is that it will melt the fat in the recipe which will change the texture of the scones.
So scomes... here we go.
Firstly, pre-heat your oven to 200C, and prepare a big flat tray by spraying it with some vegetable oil spray, or covering it with a sheet of baking paper.
Lady Flo wants me to start off with 55g of butter. I start off with 55g of nuttelex. You're all familiar with this stuff now I'm sure! you'll find it at the supermarket in the same area the butter is.
 |
| The originator with the flavour |
After this, I look over at the stove and give my soup a big stir to make sure it's doing okay.
Lady flow now wants me to mix the mashed pumpkin in with the butter. easy... done.
She now wants me to mix an egg in there too. Sorry Lady Flo, I'm going to use some stuff called 'no egg'. it's an egg replacer you can find in the health-food aisle at the supermarket. It comes in a box. The box tells me that a tablespoon of no egg plus two tablespoons of water will replicate an egg in a baking recipe. In they go.
Now Lady Flo wants me to add half a cup of milk. I add half a cup of soy milk, and mix it up. This will look pretty "wet" but don't worry, you're going to add the self raising flour soon.
You need to follow the instructions a bit carefully here, and add the flour bit-by-bit. You need 2.5 cups of self raising flour, so if you add it in five increments of half a cup each that will work out fine. Make sure that before you add the next increment the first increment is fully mixed through.
At this stage I checked my soup and gave it another stir. My pumpkin was still fairly hard and needed more cooking. If your pumpkin is very soft and starting to break apart, then you can turn the stove off, put the lid on the pot and keep it there until you're ready to get back to the soup for the next stage.
My resultant dough was fairly 'sticky'. If your dough is too sticky you can add a little extra flour. Add it in small increments, about a dessert spoon at a time. It's likely that your dough will be fairly sticky as well. Don't fret this is common with pumpkin scones.
Once you are happy with your dough, then sprinkle some flour on a work surface. Top tip for those who don't love cleaning up their kitchen, you can restrain yourself to a large chopping board to make the clean-up easier, it can be simpler to wash a chopping board than to wipe down your whole bench. tip your dough our onto the floured work surface.

1)pat the dough down until it's about half the height compared to when just tipped out of the bowl.
2)take the top part of the dough, and fold it in half towards yourself, like a calzone or pastie shape.
3)rotate the dough ninety degrees.
4)repeat steps one and two.
Your scone dough will need to be taken through the above process four times maximum.
Once you've done that you can either pat the dough down until it's about 2cm thick. If you have a rolling pin that will make the job a bit quicker, but your hands will do the job just fine.
 | |
| scone dough ready to cut |
You can see in the picture above that I'm using a glass to cut my scones out into nice circles. I'm dipping the edges of the glass into the flour, then starting out at the edges to cut as many scones as I can. Place each scone on your prepared tray as you go.
you will end up with 'scraps', make these into a blob again, roll them out and cut again. you may end up with one slightly funny-shaped scone at the end. Nobody will mind.
Once you've cut out your scones and got them all onto the tray put them in the oven to bake for 15 minutes. You'll be in the kitchen finishing the soup while they are cooking so there's little risk of over-doing them. Once they start to smell wonderful they're done.
I check on my soup now, and discover that happily my pumpkin is really soft and breaking up. It's time to blend my pumpkin soup. If you have a stick blender and can blend the soup while it's still in the pot that's great. If not don't worry, pumpkin soup was invented before the stick blender was, just use your potato masher. It will be quicker than you think as long as your pumpkin is really really soft.
Once your soup is mashed or blended, return it to the stove on a low heat. Start by adding 1/2 cup of soy milk and stir through. Use extra soy milk, water, or a bit more cooking time to adjust the texture of the soup to your personal taste. Once you are happy with the texture, then taste the soup. Is it good? could it do with more bite?-add a little bit of pepper more zing?-add a little more crushed garlic, or even some crushed ginger not salty enough?-add a pinch more salt. Once you are happy, keep the soup on a low heat with stirring until it simmers again, then turn the stove off, it's ready to go.
If things play out just right, the time it takes you to finish the soup will be about the same as the time it takes for the scones to be ready.
Here's what my finished soup looked like;
 | |
| Pumpkin soup |
Here's how the pumpkin scones came out. If your sense of smell doesn't tell you the scones are done, then once the timer goes off you can try a simple test. Using oven gloves turn one of the scones upside down and give it a tap on the bottom. If it sounds hollow it's done.
 |
| That would been a really cool arty shot if I could focus the bloody camera. |
The soup and scones were well received. A colleague suggested that I enter them into a country show. That would actually be a very good test of my scones... to see if they can truly go head-to-head with their non-vegan counterparts.
In summary.. My scones are different to Nigella's. I think they achieve the same job though, these scones would be absolutely respectable and lovely to take when visiting grand-ma. The soup..... fantastic. The perfect tummy-warmer on a chilly day.
Have a go at making these and let me know how it works out for you. Happy cooking!
Tuesday, 24 April 2012
Nigella's Potato Rostini
**+I need to start this blog with an apology. Firstly, sorry for the month gap between posts. Work has been nuts, then my computer had a bit of a tanty. Moving onto my next apology, This blog is a bit light on with pictures. I was lucky enough to have a good friend take some action shots for me, but then I got lost in the logistics of getting those pictures from my friends phone, to my work email, thence my computer thence this blog. However, this blog is called "Megan Makes it Vegan" not "Confessions of a techno-tard" so let's press on.
Nigella's potato Rostini is a really simple recipe, and this blog is a bit of a doddle really, as Nigella makes this dish vegan without even realising it. Thanks Nigella!!!.
Nigella prepares the rostini as a quick and delicious alternative to baked potatoes, which is a great idea if you want the comfort-food factor of roasties on a cold wintery night, but its mid-week, you've just rushed home from work and you don't have time to do something for dinner that takes ages to cook. She served these as a side dish, but I did mine as finger-food for my guests.
I made the decision to do these as I was under a bit of time pressure, I'd invited my guests around at short notice as they'd had some bad news during the day and needed comforting. To provide a very little bit of back-story, my very good friend and her husband went through the awful experience of having to put their beloved pet dog to rest. The poor guy had been struggling with health issues for a long time, and despite everyone's best efforts really started to lose his battle with cancer. Frankly, if I'm ever in that condition I'd like someone to put me out of my misery.
So.... cook some food to make it all better after your friend's dog had to be put to sleep. No pressure Megan just don't fuck it up.
I raced home from work on my push-bike, a journey that would usually take 55 minutes took me an hour twenty, I had the "weight penalty" AKA my work lap-top, and there was more wind than a baked beans convention out there.
I staggered off my bike, and dived into my car for a quick trip to the shops for a few nibbles and drinks and things. As I was leaving the supermarket and loading my car with goodies, I got that SMS from my friend. "We're on our way over. Can't bear to go home to a dog-less house".
I used the spare 30 seconds I had to sit in my car at the supermarket car park and cry. I knew that SMS meant that our big mate's battle had come to an end. I toughened myself up and drove home, to get organised for my guests.
Phew... okay back to cooking. The rostini are incredibly simple to make. You will need.
-1 packet of store bought gnocchi. (to make sure its vegan check the label, usually the ones that are vacuum packed on the shelf are vegan, less likely for the 'fresh' types in the fridge section) Gnocchi is traditionally made with potatoes, flour and eggs. Many factories substitute the eggs with more potato-starch to stick them together as its a lot cheaper to make that way.
-vegetable oil (you are going to use quite a lot of this, so a cheaper blended vegetable oil is fine it doesn't have to be expensive extra-virgin olive oil)
-salt.
Quite simply, you will be deep-frying the gnocchi and sprinkling it with a bit of salt at the end. However, this wouldn't be my blog if I didn't pedantically outline every step you need to take from which drawer the spoons are in to what my cats are doing while I'm cooking, so let's press on.
Firstly you need a clean and dry fry-pan, deep enough to deep fry the gnocchi. If you're not sure if your pan is deep enough open the packet of gnocchi and take one gnocchi out. (funny the word gnocchi is like sheep!.... singular is the same as the plural) hold it up next to your fry-pan. If there's room for it to be completely covered in oil in there, then the pan is deep enough. If in doubt go for a deeper pan, or even a wok.
Pour a generous amount of oil into the pan. You need to heat this oil before frying. Turn the stove up to high.
Safety note: deep frying isn't an activity you can walk away from, once you start heating the oil you really need to stay in the kitchen. One of the most common house fire types are those caused by cooking oil and it doesn't take much for the stuff to ignite.
Depending on factors such as how cold your oil was to start with, how much oil you have, how wide your pan is and how hot your stove top can get your oil may take anything from a couple of minutes up to ten minutes to heat enough to fry stuff in. If you're not sure the oil is ready but want to test it you can get a small cube of stale bread and drop it in. If the bread sizzles nicely and goes golden brown within about ten seconds then the oil is ready to go. If the bread just sits there, and soaks up the oil then you need to wait for it to heat up some more.
Once the oil is heated you will need to put the gnocchi in. Do this carefully as the oil might splash and I don't want you to get injured. If you can stand at arm's length from the pot, and tip the gnocchi in from as close above the level of the oil as you can. This will help the gnocchi fall into the pot at a slower speed, creating less splash. Feel free to have some judges standing by to give them a high-score on the double-pike-splash-free-entry.
Then, let them deep fry. They'll take a while. Nigella said that hers took fifteen minutes. The oil will bubble furiously. Remain at your station, and use a spatula or wooden spoon to gently stir every now and then, this will just make sure that nothing gets stuck to the bottom or sides of the pot.
My boy cat came in to entertain me while I was making my rostini.
The result... (sorry no picture) golden-brown gnocchi deep fried goodness. I found them to be the 'best of both worlds' between chips and potato gems. Possibly a big call. You be the judge, make some yourself and let me know what you think?
Personally... I can't wait to make these again, let them cool down a little and toss some through a big green salad for a bit of added interest and possibly a big middle-finger in the direction of eating salads as a form of self-loathing and calorie restriction. The salad is a beautiful beautiful thing. But that's a topic of another blog (or twenty).
So in conclusion... Making this one vegan was easy-peasy. Nigella already made it vegan. No differences, no comparisons to make. Enjoyment factor? they all got consumed by my guests. They do make a bit of a conversation point... "Really, you can deep fry gnocchi?"
Have fun cooking something vegan :)
Nigella's potato Rostini is a really simple recipe, and this blog is a bit of a doddle really, as Nigella makes this dish vegan without even realising it. Thanks Nigella!!!.
| |
| Nigella says "No worries Megan I did it for you" |
Nigella prepares the rostini as a quick and delicious alternative to baked potatoes, which is a great idea if you want the comfort-food factor of roasties on a cold wintery night, but its mid-week, you've just rushed home from work and you don't have time to do something for dinner that takes ages to cook. She served these as a side dish, but I did mine as finger-food for my guests.
I made the decision to do these as I was under a bit of time pressure, I'd invited my guests around at short notice as they'd had some bad news during the day and needed comforting. To provide a very little bit of back-story, my very good friend and her husband went through the awful experience of having to put their beloved pet dog to rest. The poor guy had been struggling with health issues for a long time, and despite everyone's best efforts really started to lose his battle with cancer. Frankly, if I'm ever in that condition I'd like someone to put me out of my misery.
So.... cook some food to make it all better after your friend's dog had to be put to sleep. No pressure Megan just don't fuck it up.
I raced home from work on my push-bike, a journey that would usually take 55 minutes took me an hour twenty, I had the "weight penalty" AKA my work lap-top, and there was more wind than a baked beans convention out there.
I staggered off my bike, and dived into my car for a quick trip to the shops for a few nibbles and drinks and things. As I was leaving the supermarket and loading my car with goodies, I got that SMS from my friend. "We're on our way over. Can't bear to go home to a dog-less house".
I used the spare 30 seconds I had to sit in my car at the supermarket car park and cry. I knew that SMS meant that our big mate's battle had come to an end. I toughened myself up and drove home, to get organised for my guests.
Phew... okay back to cooking. The rostini are incredibly simple to make. You will need.
-1 packet of store bought gnocchi. (to make sure its vegan check the label, usually the ones that are vacuum packed on the shelf are vegan, less likely for the 'fresh' types in the fridge section) Gnocchi is traditionally made with potatoes, flour and eggs. Many factories substitute the eggs with more potato-starch to stick them together as its a lot cheaper to make that way.
 |
| Generic picture of a packet of gnocchi |
-vegetable oil (you are going to use quite a lot of this, so a cheaper blended vegetable oil is fine it doesn't have to be expensive extra-virgin olive oil)
-salt.
Quite simply, you will be deep-frying the gnocchi and sprinkling it with a bit of salt at the end. However, this wouldn't be my blog if I didn't pedantically outline every step you need to take from which drawer the spoons are in to what my cats are doing while I'm cooking, so let's press on.
Firstly you need a clean and dry fry-pan, deep enough to deep fry the gnocchi. If you're not sure if your pan is deep enough open the packet of gnocchi and take one gnocchi out. (funny the word gnocchi is like sheep!.... singular is the same as the plural) hold it up next to your fry-pan. If there's room for it to be completely covered in oil in there, then the pan is deep enough. If in doubt go for a deeper pan, or even a wok.
Pour a generous amount of oil into the pan. You need to heat this oil before frying. Turn the stove up to high.
Safety note: deep frying isn't an activity you can walk away from, once you start heating the oil you really need to stay in the kitchen. One of the most common house fire types are those caused by cooking oil and it doesn't take much for the stuff to ignite.
Depending on factors such as how cold your oil was to start with, how much oil you have, how wide your pan is and how hot your stove top can get your oil may take anything from a couple of minutes up to ten minutes to heat enough to fry stuff in. If you're not sure the oil is ready but want to test it you can get a small cube of stale bread and drop it in. If the bread sizzles nicely and goes golden brown within about ten seconds then the oil is ready to go. If the bread just sits there, and soaks up the oil then you need to wait for it to heat up some more.
Once the oil is heated you will need to put the gnocchi in. Do this carefully as the oil might splash and I don't want you to get injured. If you can stand at arm's length from the pot, and tip the gnocchi in from as close above the level of the oil as you can. This will help the gnocchi fall into the pot at a slower speed, creating less splash. Feel free to have some judges standing by to give them a high-score on the double-pike-splash-free-entry.
Then, let them deep fry. They'll take a while. Nigella said that hers took fifteen minutes. The oil will bubble furiously. Remain at your station, and use a spatula or wooden spoon to gently stir every now and then, this will just make sure that nothing gets stuck to the bottom or sides of the pot.
My boy cat came in to entertain me while I was making my rostini.
 |
| Yep... I'm a cat. |
Personally... I can't wait to make these again, let them cool down a little and toss some through a big green salad for a bit of added interest and possibly a big middle-finger in the direction of eating salads as a form of self-loathing and calorie restriction. The salad is a beautiful beautiful thing. But that's a topic of another blog (or twenty).
So in conclusion... Making this one vegan was easy-peasy. Nigella already made it vegan. No differences, no comparisons to make. Enjoyment factor? they all got consumed by my guests. They do make a bit of a conversation point... "Really, you can deep fry gnocchi?"
Have fun cooking something vegan :)
Wednesday, 21 March 2012
The best vegan cheesecake
I was a bit disheartened after the pasta. Nonetheless, I watched onwards, perched cross-legged on my couch with my notebook in front of me. Nigella introduces her recipe. "The french have a saying... everything in moderation, including moderation" I first heard that saying from an old boss, but anyway, he probably stole it from the French.
Nigella then goes on to announce that she is going to make a chocolate peanut-butter cheesecake. Booyeah! I exclaim. Chocolate and peanut butter are like the Cheech and Chong of vegan dessert. calming myself, and taking my pen in hand to take notes I admonish my television.
"Nigella this had better be good, I can't get in the fail-zone here"
The recipe starts off with a biscuit base for the cheesecake. Nigella wants you to use the following.
200g biscuits. I used "Nice" biscuits, because a packet of Arnott's Nice biscuits are vegan (seriously read the label... no milk, no butter, all vegetable shortening, flour and sugar) and well, they're... pretty good! (sorry I did steal that joke from a friend.)
50g butter. I replaced this with 50g of Nuttelex, and 1 tablespoon of vegetable oil.
Sorry, for those who are a bit new to cooking here's a quick spoon tutorial.
The spoon on the left is a teaspoon. It is commonly used for stirring cups of tea, or adding sugar to your tea. (if you don't use cubes) The standard teaspoon should hold 5ml of fluid. In a recipe this will be abbreviated to a "tsp"
The spoon in the middle is a dessert spoon. It's the type of spoon you see at restaurants used for eating desserts. This isn't usually used as a measure in recipes, so if I ever use one I'll use its full name so there's no confusion.
The spoon on the right is a table-spoon. You may also know it as a soup-spoon. It should be the biggest spoon in the cutlery drawer. A standard tablespoon should hold 25ml of fluid. In recipes it will be referred to as a "tbsp"
Moving on. I have 200g biscuits, 50g Nuttelex, and a "Tbsp" of vegetable oil in a big mixing bowl.
Nigella wants me to throw in 100g of chocolate chips.
I decided to make this recipe a bit more "grown up" by using very strong dark chocolate. My chocolate is 85% cocoa mass, here it is.
I buy this one because its vegan, it's absolutely delicious and its fair trade. Fair trade cocoa products help make sure that farmers in third world countries aren't getting ripped off by big corporations purely so we can have cheap crappy unsatisfying chocolate. Yes, the fair trade ultra dark chocolate costs more. I promise you that the satisfaction you get from even a small serving of this chocolate will far outweigh the enjoyment you'll get from a watered-down, over-sweetened block of cadbury's crap. Also I'd be a pretty piss-poor vegan if I cared about the animals so much that I couldn't even take honey from a bee, but didn't give a crap about people working their backs off on a farm.
Instead of Nigella's 100g of chocolate chips I've used only 50g of this chocolate. It's much stronger in flavour. I use just a regular knife, and chop it into small but roughly-shaped pieces. Leave it on the bench for now, or put it aside.
Nigella also wants me to use 50g of peanuts. I decide to balance out the quantities here, and add in 100g of salted peanuts. Ie Nigella's Peanuts + chocolate = 150g, and so does mine. I've just changed the ratio around.
Nigella just throws all of these ingredients into a food processor and wizzes the living daylights out of it. I don't own a food processor. They're a bit expensive to buy and they use lots of electricity. They also take up a fair bit of bench real-estate, so if you only use it occasionally or have a small kitchen, it might not be the gadget for you.
I do need to crush my biscuits down to crumbs though, so here's my solution.
What you see there is a heavy glass coffee jar. (a wine bottle or a heavy food tin would work just as well) wrapped in al-foil. I'm using this, and a bit of work from me to crush the biscuits. I get a bit of a free work-out and it's a handy way to save some electricity. You could also use a thick big glad-bag and a rolling pin, just be gentle with the rolling pin so you don't accidentally split the bag open and end up with biscuit crumbs EVERYWHERE. (I do mean everywhere.)
Once you have your biscuits crushed down to crumbs. (took me about 5 minutes of work) then mix through your chocolate chips and peanuts. then add the oil and the butter. I used my fingers to work the butter through the biscuit mix, being careful to use just the tips of my fingers up to the knuckles, and squashing the butter and biscuit mix between my fingers and thumb until the contents of the bowl is completely mixed through. (homogeneous in engineering speak)
Once you've done that, you need to transfer your biscuit mix to a "spring-form tin" this is a fancy cake tin that has a spring-loaded release so you can take the sides away from the cake at the end of the job. It's okay if you don't have one. You could assemble this in a shallow pie tin, or a square casserole dish, the only catch is that you will need to be careful with a spatula to get portions out at the end, and accept a bit of mess on the way out. If you want to find yourself a spring-form tin, they are at most shops that sell kitchen-type stuff, or keep an eye out at 2nd hand sales, as I find often that the older style baking tins and kitchen gadgets feel a bit more robust than the chain-store stuff. That being said, if you're only going to use your spring-form tin on special occasions, then don't feel like you need to spend a whole day's pay on the thing. Just get the cheapest one you can find, or drop me an email and borrow mine.
Enough waffling. Here's what my biscuit base looked like.
It doesn't look like much on camera, but this smelled just divine. Wonderfully sweet and nutty.
Put this in the fridge, and when you're ready get to work on the rest of the cheesecake. We're going to make the filling now.
Firstly, pre-heat your oven to 170C.
Obviously... vegans don't eat cheese. The bulk of my cheesecake filling is going to be made from a really awesome product called Tofutti. It's a tofu-based "better than cream cheese" that really tastes excellent. You find it in the fridge section of the supermarket, next to the regular cream cheese. A word of caution, for some reason it's a bit hit and miss with finding this stuff at the shops... sometimes woolies will have it, sometimes they're out of stock, sometimes they just don't carry it at all locations. Coles doesn't carry it at all. I think that you can order it through woolies online though, and get it delivered anywhere in their delivery network.
Here's the tofutti.
For some vegans, Tofutti is a bit controversial. Tofutti may contain white or castor sugar. In order to get the sugar white the sugar cane juice in the sugar factory is filtered through an activated carbon filter. The activated carbon filter is commonly made from bone char, which is the burned to ash remains of animal skeletons from slaughterhouses.
None of the carbon from the filter ends up in the final product, but it's used to make the white sugar that may go into the Tofutti. As a vegan I'm sad that the use of animals gets into so many industries and areas of our lives, into things that we wouldn't even think of. However, I still use Tofutti for 2 reasons. Firstly, the main competitor to Tofutti (Kingsland) cream cheese uses commercially obtained "raw" sugar. I'm sure you've seen the raw sugar at the supermarket, the crystals are a bit bigger, and not as white as the finer white sugar. Raw sugar is just white sugar that's had some of the cane juice mixed back in to give it a more "natural" feel in a lot of cases. So not only is it filtered through the same bone-char filter that the white sugar is filtered through, but it's had some of the waste product, containing traces of that bone char mixed back in with it, it doesn't taste as good and you need to go to the health-food shop to buy it... if you're lucky enough to find one who stocks it.
In a world with less demand for animal products, the skeletons of cows, pigs and sheep wouldn't be considered a waste-product to be burned down and sold to food and chemical processing plants, we'd find another solution to filter our sugar cane. The act of buying Tofutti doesn't provide material support to the animal exploitation industry, and by asking for it at your local supermarket you're creating a vocal demand for animal-free products. I personally think arguing about Tofutti when there's battery hens and veal crates is kind of missing the forest for the trees. Not every vegan will agree with me on this one, that's okay this world would be a boring place if everyone saw eye to eye on everything.
Okay, moving forwards. I'm going to use both of those containers of Tofutti in this recipe. So, into the mixing bowl they go.
Now, it gets complicated. Nigella has very helpfully told me to use "a dollop" of sour cream, and "a splodge" of peanut butter. She also wants 3 eggs, and 3 egg yolks. Ha! you have to own up to exactly how many eggs you used!
I mutter at the TV "stop stuffing me around Nigella, just give me your recipe!" I make an executive decision.
I'm going to use some silken tofu to help bind it together, that will do the duty of the eggs, and part of the duty of the sour cream.
Silken Tofu looks like this
To open the packet run a knife along the edges of the plastic then remove the lid. Take it to the sink, and place one hand over the top. Gently tip the tofu container upside down, letting the block of tofu sit on the palm of your hand. Be gentle with silken tofu, it falls apart easily.
Place the block of silken tofu on your chopping board, and take the portion you need. This is a 300g package, and I used half of the packet, so 150g of tofu.
To keep your left over tofu fresh, keep it in a container covered in water in the fridge. I just re-used my tofu container like this.
 I translated Nigella's "splodge" of peanut butter into a very generous 150grams.
Now into that mixing bowl with the tofutti, tofu and peanut butter you need to add 200g of sugar. Yes, I've used white castor sugar.
As an added extra, I'm putting in 1tbs (yes you cooking champion you know that's a tablespoon) of lemon juice. This is to replicate a little bit of the sourness of sour cream. Again, at this point, Nigella presses a button on her food-processor and looks winsomely at the camera for a moment as the electric motor whirs into action and makes her cheesecake middle homogeneous. I use a wooden spoon. Free workout, saves electricity. Take the time to mix it gently, to make sure the tofu is fully incorporated. It should look smooth and glossy.
One advantage of the vegan version is that you can safely taste this raw. Eating raw eggs can actually make you ill. Go on, have a taste. This is your dish, so you can make it how you like it. Is it peanutty enough? sweet enough? sour enough? use the sugar, peanut-butter and lemon juice to adjust the taste to suit your needs. If you want to change the flavour a bit add a small amount first, mix it through fully, then taste again. The quantities I've used will depend on my lemons and on my brand of peanut butter, yours may vary.
Once you are happy with the taste, it's time to get your biscuit base out of the fridge. Pour the cheese-cake mix over the biscuit base, and use your wooden spoon to very gently spread the cheese-cake middle around making sure the biscuit base is fully covered. Scrape the bowl really well, you want to get it all onto the biscuit base.
Nigella didn't give an accurate baking time in her show.... The paranoid part of me is starting to think that she just wants you to watch her cook... she doesn't want you t o cook it yourself from the DVD... maybe it's a shameless ploy by "the man" to make you rush out and buy the book. Don't be co-opted into the TV chef mantra of "it must be perfect."... I just take a punt, and set my oven timer to 20 minutes. You could quite safely eat everything in that spring-form tin as-is, there's nothing that needs to be cooked to prevent food poisioning. At the same time, I want it to bake a little bit to let the Tofu help set everything together, and for those chocolate chips in my biscuit base to melt and mush around a bit.
I check on it at 10 minutes, but decide to let it go for the full 20 minutes. Your oven may be a little bit more keen than mine, so I'd suggest a 10 minute check-up on your cheesecake is a good idea. By the time it's done, the top will have gone a slightly darker golden brown and the biscuit base will smell just wonderful. Warm, sweet, chocolatey and inviting.
Once it's baked set your cheesecake aside to cool.
You're going to prepare the rich chocolate ganache topping. I've used very dark chocolate to make mine a bit grown up. I love the bitter dark chocolate taste. If that's not your preference, then check out the health-food aisle of the supermarket or the "allergy aisle" and get yourself some dairy free chocolate. It's milder and a bit smoother than the rich dark chocolate.
I took 150g of my chocolate, and placed it in a double boiler. Goodness, what's a double boiler you say. Well, again it's something you can buy to put on the stove to help you melt chocolate, or you could just make one like I did.
There is a pot with water in it on the stove, with the stove up to about half-power. Sitting over the pot is a shallow/wide mixing bowl. I've used one made from fairly thin aluminium so that it's a good conductor. Place the bowl on top of the pot and put your chocolate in there. It will melt gently as you watch. If it gets too hot, put an oven-glove on and lift the bowl away from the pot. If it's not heating up enough crank the stove up a bit.
To my chocolate I added 50g of nuttelex and half a cup of icing sugar. I mixed it over the hot water until everything was fully combined. Your mixture should look glossy and beautiful.
Then, while the mixture is still quite warm spread it over the top of the cheesecake. you need to be very gentle here, as the "skin" on the top of the cheesecake layer is fairly fragile, so it's easier if you pour from the bowl across the area of the cheesecake to minimise the amount of spreading you need to do. I used the back of my dessert spoon to gently spread it around.
I then sprinkled the top of the cheesecake with a handful of peanuts. This is kind of in homage to Nigella. She finished this episode by slinking to her fridge, a svelte sexy figure clothed in silk, sneaking through the night to steal some leftovers... she sprinkles her chocolate covered cheesecake with a hand-full of salty peanuts and devours a deliciously large mouthful.
So, I sprinkle my whole cheesecake with salty peanuts to offset the bitter-sweet rich chocolate topping. I live by myself (with the cats) so slinking to the fridge is a bit redundant, I'm just saving myself from an injury induced by tripping over a cat while trying to out-slink a natural hunter to the fridge in the dark.
You're almost finished! place your cheesecake in the fridge, and let it set for a few hours. Overnight would be even better.
I took my cheesecake into my office today, to share as part of a harmony day morning tea. I decided that since we'd all been invited to share food that was important to our personal culture or heritage, that I'd like to share my vegan food culture with my colleagues. It takes a rather brave soul to try a new recipe with a pretty major degree of ad-libbing upon work colleagues, but that's just how I roll I guess. I'll admit to a small amount of trepidation when I un-hinged the spring-form tin in our little office kitchen.
Here's how it went.
It looks like a cake! like a cheesecake! Everyone at work knows it's vegan, because they know I'm vegan. Even after being told that there's tofu in it, some of my work colleagues were happy to give it a try. Thanks colleagues! Here's some of the reviews I got.
"I've only ever had tofu in stir-fries before I didn't know you could do this... I'm a fan"
"Lovely, really light, fluffy, sweet..."
"If you hadn't have told me that there was no dairy in this I would have thought it was made with real cream cheese"
and my review... is in the title of this blog entry. The best vegan cheesecake I have ever made. Rich, indulgent, sweet, powerful. This was something I was very proud to present to my colleagues, all of whom are people I like far too much to want to see them eating mediocre food.
So the verdict.
This dish is a lot of work... but a cheesecake in general is a lot of work, so I wouldn't rate it as being more work than making a cheesecake with actual cheese and eggs in there. It's a bit of a step up if you're a novice cook, but it's do-able. Just take it slowly, and don't do it in a rush, you'll be fine.
Cost... my version is possibly more expensive than Nigella's version. The Tofutti isn't cheap, about four bucks a container. The fair-trade dark chocolate is also not cheap. You wouldn't be making this every week, as far as an indulgent dessert goes I think it really delivers great bang-for-buck.
Appearance... I liked it, and my colleagues generally enjoyed the appearance of my cheesecake. The edges are a bit crumbly in the picture, but remember mine has taken a trip from home to the office.
Enjoyment.. I enjoyed making this, I enjoyed eating it. (I have a bit of a sugar high now actually) and I really, really enjoyed watching a bunch of non-vegans turn take the first bite with a bit of trepidation, then rapidly savour their way through the rest of the serving.
Nutrition: My version will have less saturated fat than Nigella's, and probably less total fat, and a lower calorie count. Nigella's will contain some vitamin B12 from the egg yolks, which my version won't have. My version with the darker chocolate will have more polyphenols and isoflavanoids.... and nobody wants to be polyphenol or isoflavanoid deficient. I don't think you eat this dish for nutrition, but if you have heart issues, or really need to cut out the cholesterol and saturated fat, then the vegan cheesecake is a great way to literally have your cake and eat it too. Making it vegan makes it cholesterol free.
Yay Nigella thanks for getting me out of the fail-zone here!
If you have a quiet afternoon and want something truly indulgent to share with someone you like, then you should really make my dark chocolate and peanut butter cheesecake.
Nigella then goes on to announce that she is going to make a chocolate peanut-butter cheesecake. Booyeah! I exclaim. Chocolate and peanut butter are like the Cheech and Chong of vegan dessert. calming myself, and taking my pen in hand to take notes I admonish my television.
"Nigella this had better be good, I can't get in the fail-zone here"
The recipe starts off with a biscuit base for the cheesecake. Nigella wants you to use the following.
200g biscuits. I used "Nice" biscuits, because a packet of Arnott's Nice biscuits are vegan (seriously read the label... no milk, no butter, all vegetable shortening, flour and sugar) and well, they're... pretty good! (sorry I did steal that joke from a friend.)
50g butter. I replaced this with 50g of Nuttelex, and 1 tablespoon of vegetable oil.
Sorry, for those who are a bit new to cooking here's a quick spoon tutorial.
 | |
| There are three spoons. |
The spoon in the middle is a dessert spoon. It's the type of spoon you see at restaurants used for eating desserts. This isn't usually used as a measure in recipes, so if I ever use one I'll use its full name so there's no confusion.
The spoon on the right is a table-spoon. You may also know it as a soup-spoon. It should be the biggest spoon in the cutlery drawer. A standard tablespoon should hold 25ml of fluid. In recipes it will be referred to as a "tbsp"
Moving on. I have 200g biscuits, 50g Nuttelex, and a "Tbsp" of vegetable oil in a big mixing bowl.
Nigella wants me to throw in 100g of chocolate chips.
I decided to make this recipe a bit more "grown up" by using very strong dark chocolate. My chocolate is 85% cocoa mass, here it is.
 |
| mmmmm chocolate. |
Instead of Nigella's 100g of chocolate chips I've used only 50g of this chocolate. It's much stronger in flavour. I use just a regular knife, and chop it into small but roughly-shaped pieces. Leave it on the bench for now, or put it aside.
Nigella also wants me to use 50g of peanuts. I decide to balance out the quantities here, and add in 100g of salted peanuts. Ie Nigella's Peanuts + chocolate = 150g, and so does mine. I've just changed the ratio around.
Nigella just throws all of these ingredients into a food processor and wizzes the living daylights out of it. I don't own a food processor. They're a bit expensive to buy and they use lots of electricity. They also take up a fair bit of bench real-estate, so if you only use it occasionally or have a small kitchen, it might not be the gadget for you.
I do need to crush my biscuits down to crumbs though, so here's my solution.
 | ||
| Maguiver... kitchen edition. |
Once you have your biscuits crushed down to crumbs. (took me about 5 minutes of work) then mix through your chocolate chips and peanuts. then add the oil and the butter. I used my fingers to work the butter through the biscuit mix, being careful to use just the tips of my fingers up to the knuckles, and squashing the butter and biscuit mix between my fingers and thumb until the contents of the bowl is completely mixed through. (homogeneous in engineering speak)
Once you've done that, you need to transfer your biscuit mix to a "spring-form tin" this is a fancy cake tin that has a spring-loaded release so you can take the sides away from the cake at the end of the job. It's okay if you don't have one. You could assemble this in a shallow pie tin, or a square casserole dish, the only catch is that you will need to be careful with a spatula to get portions out at the end, and accept a bit of mess on the way out. If you want to find yourself a spring-form tin, they are at most shops that sell kitchen-type stuff, or keep an eye out at 2nd hand sales, as I find often that the older style baking tins and kitchen gadgets feel a bit more robust than the chain-store stuff. That being said, if you're only going to use your spring-form tin on special occasions, then don't feel like you need to spend a whole day's pay on the thing. Just get the cheapest one you can find, or drop me an email and borrow mine.
Enough waffling. Here's what my biscuit base looked like.
 |
| Cheesecake foundations. |
Put this in the fridge, and when you're ready get to work on the rest of the cheesecake. We're going to make the filling now.
Firstly, pre-heat your oven to 170C.
Obviously... vegans don't eat cheese. The bulk of my cheesecake filling is going to be made from a really awesome product called Tofutti. It's a tofu-based "better than cream cheese" that really tastes excellent. You find it in the fridge section of the supermarket, next to the regular cream cheese. A word of caution, for some reason it's a bit hit and miss with finding this stuff at the shops... sometimes woolies will have it, sometimes they're out of stock, sometimes they just don't carry it at all locations. Coles doesn't carry it at all. I think that you can order it through woolies online though, and get it delivered anywhere in their delivery network.
Here's the tofutti.
 |
| Tofutti |
None of the carbon from the filter ends up in the final product, but it's used to make the white sugar that may go into the Tofutti. As a vegan I'm sad that the use of animals gets into so many industries and areas of our lives, into things that we wouldn't even think of. However, I still use Tofutti for 2 reasons. Firstly, the main competitor to Tofutti (Kingsland) cream cheese uses commercially obtained "raw" sugar. I'm sure you've seen the raw sugar at the supermarket, the crystals are a bit bigger, and not as white as the finer white sugar. Raw sugar is just white sugar that's had some of the cane juice mixed back in to give it a more "natural" feel in a lot of cases. So not only is it filtered through the same bone-char filter that the white sugar is filtered through, but it's had some of the waste product, containing traces of that bone char mixed back in with it, it doesn't taste as good and you need to go to the health-food shop to buy it... if you're lucky enough to find one who stocks it.
In a world with less demand for animal products, the skeletons of cows, pigs and sheep wouldn't be considered a waste-product to be burned down and sold to food and chemical processing plants, we'd find another solution to filter our sugar cane. The act of buying Tofutti doesn't provide material support to the animal exploitation industry, and by asking for it at your local supermarket you're creating a vocal demand for animal-free products. I personally think arguing about Tofutti when there's battery hens and veal crates is kind of missing the forest for the trees. Not every vegan will agree with me on this one, that's okay this world would be a boring place if everyone saw eye to eye on everything.
Okay, moving forwards. I'm going to use both of those containers of Tofutti in this recipe. So, into the mixing bowl they go.
Now, it gets complicated. Nigella has very helpfully told me to use "a dollop" of sour cream, and "a splodge" of peanut butter. She also wants 3 eggs, and 3 egg yolks. Ha! you have to own up to exactly how many eggs you used!
I mutter at the TV "stop stuffing me around Nigella, just give me your recipe!" I make an executive decision.
I'm going to use some silken tofu to help bind it together, that will do the duty of the eggs, and part of the duty of the sour cream.
Silken Tofu looks like this
 |
| Fermented soy goodness. |
Place the block of silken tofu on your chopping board, and take the portion you need. This is a 300g package, and I used half of the packet, so 150g of tofu.
To keep your left over tofu fresh, keep it in a container covered in water in the fridge. I just re-used my tofu container like this.

Now into that mixing bowl with the tofutti, tofu and peanut butter you need to add 200g of sugar. Yes, I've used white castor sugar.
As an added extra, I'm putting in 1tbs (yes you cooking champion you know that's a tablespoon) of lemon juice. This is to replicate a little bit of the sourness of sour cream. Again, at this point, Nigella presses a button on her food-processor and looks winsomely at the camera for a moment as the electric motor whirs into action and makes her cheesecake middle homogeneous. I use a wooden spoon. Free workout, saves electricity. Take the time to mix it gently, to make sure the tofu is fully incorporated. It should look smooth and glossy.
 |
| Almost perfectly mixed. |
Once you are happy with the taste, it's time to get your biscuit base out of the fridge. Pour the cheese-cake mix over the biscuit base, and use your wooden spoon to very gently spread the cheese-cake middle around making sure the biscuit base is fully covered. Scrape the bowl really well, you want to get it all onto the biscuit base.
Nigella didn't give an accurate baking time in her show.... The paranoid part of me is starting to think that she just wants you to watch her cook... she doesn't want you t o cook it yourself from the DVD... maybe it's a shameless ploy by "the man" to make you rush out and buy the book. Don't be co-opted into the TV chef mantra of "it must be perfect."... I just take a punt, and set my oven timer to 20 minutes. You could quite safely eat everything in that spring-form tin as-is, there's nothing that needs to be cooked to prevent food poisioning. At the same time, I want it to bake a little bit to let the Tofu help set everything together, and for those chocolate chips in my biscuit base to melt and mush around a bit.
I check on it at 10 minutes, but decide to let it go for the full 20 minutes. Your oven may be a little bit more keen than mine, so I'd suggest a 10 minute check-up on your cheesecake is a good idea. By the time it's done, the top will have gone a slightly darker golden brown and the biscuit base will smell just wonderful. Warm, sweet, chocolatey and inviting.
Once it's baked set your cheesecake aside to cool.
You're going to prepare the rich chocolate ganache topping. I've used very dark chocolate to make mine a bit grown up. I love the bitter dark chocolate taste. If that's not your preference, then check out the health-food aisle of the supermarket or the "allergy aisle" and get yourself some dairy free chocolate. It's milder and a bit smoother than the rich dark chocolate.
I took 150g of my chocolate, and placed it in a double boiler. Goodness, what's a double boiler you say. Well, again it's something you can buy to put on the stove to help you melt chocolate, or you could just make one like I did.
 | |
| Maguiver... kitchen edition. |
To my chocolate I added 50g of nuttelex and half a cup of icing sugar. I mixed it over the hot water until everything was fully combined. Your mixture should look glossy and beautiful.
Then, while the mixture is still quite warm spread it over the top of the cheesecake. you need to be very gentle here, as the "skin" on the top of the cheesecake layer is fairly fragile, so it's easier if you pour from the bowl across the area of the cheesecake to minimise the amount of spreading you need to do. I used the back of my dessert spoon to gently spread it around.
I then sprinkled the top of the cheesecake with a handful of peanuts. This is kind of in homage to Nigella. She finished this episode by slinking to her fridge, a svelte sexy figure clothed in silk, sneaking through the night to steal some leftovers... she sprinkles her chocolate covered cheesecake with a hand-full of salty peanuts and devours a deliciously large mouthful.
So, I sprinkle my whole cheesecake with salty peanuts to offset the bitter-sweet rich chocolate topping. I live by myself (with the cats) so slinking to the fridge is a bit redundant, I'm just saving myself from an injury induced by tripping over a cat while trying to out-slink a natural hunter to the fridge in the dark.
You're almost finished! place your cheesecake in the fridge, and let it set for a few hours. Overnight would be even better.
I took my cheesecake into my office today, to share as part of a harmony day morning tea. I decided that since we'd all been invited to share food that was important to our personal culture or heritage, that I'd like to share my vegan food culture with my colleagues. It takes a rather brave soul to try a new recipe with a pretty major degree of ad-libbing upon work colleagues, but that's just how I roll I guess. I'll admit to a small amount of trepidation when I un-hinged the spring-form tin in our little office kitchen.
Here's how it went.
 | |
| Yayyyyy111!!!111 |
"I've only ever had tofu in stir-fries before I didn't know you could do this... I'm a fan"
"Lovely, really light, fluffy, sweet..."
"If you hadn't have told me that there was no dairy in this I would have thought it was made with real cream cheese"
and my review... is in the title of this blog entry. The best vegan cheesecake I have ever made. Rich, indulgent, sweet, powerful. This was something I was very proud to present to my colleagues, all of whom are people I like far too much to want to see them eating mediocre food.
So the verdict.
This dish is a lot of work... but a cheesecake in general is a lot of work, so I wouldn't rate it as being more work than making a cheesecake with actual cheese and eggs in there. It's a bit of a step up if you're a novice cook, but it's do-able. Just take it slowly, and don't do it in a rush, you'll be fine.
Cost... my version is possibly more expensive than Nigella's version. The Tofutti isn't cheap, about four bucks a container. The fair-trade dark chocolate is also not cheap. You wouldn't be making this every week, as far as an indulgent dessert goes I think it really delivers great bang-for-buck.
Appearance... I liked it, and my colleagues generally enjoyed the appearance of my cheesecake. The edges are a bit crumbly in the picture, but remember mine has taken a trip from home to the office.
Enjoyment.. I enjoyed making this, I enjoyed eating it. (I have a bit of a sugar high now actually) and I really, really enjoyed watching a bunch of non-vegans turn take the first bite with a bit of trepidation, then rapidly savour their way through the rest of the serving.
Nutrition: My version will have less saturated fat than Nigella's, and probably less total fat, and a lower calorie count. Nigella's will contain some vitamin B12 from the egg yolks, which my version won't have. My version with the darker chocolate will have more polyphenols and isoflavanoids.... and nobody wants to be polyphenol or isoflavanoid deficient. I don't think you eat this dish for nutrition, but if you have heart issues, or really need to cut out the cholesterol and saturated fat, then the vegan cheesecake is a great way to literally have your cake and eat it too. Making it vegan makes it cholesterol free.
Yay Nigella thanks for getting me out of the fail-zone here!
If you have a quiet afternoon and want something truly indulgent to share with someone you like, then you should really make my dark chocolate and peanut butter cheesecake.
Subscribe to:
Comments (Atom)